

Sub-directory hosting
How to host your Bullet site as a subdirectory?
If you already have your website on other 3rd party tools and you want to use bullet only for specific use cases like Blog or a knowledge base, you can achieve that using reverse-proxy.
Note: Once you have configured your bullet site in a sub-directory, your internal links will not work in the bullet-pages.dev subdomain. However, there will be no issues in the domain that you have configured.
Step 1: Configuring your Sub-Directory
The first step is to configure your subdirectory in the bullet dashboard.
- Navigate to the domains section and click on the “Sub-Directory”.
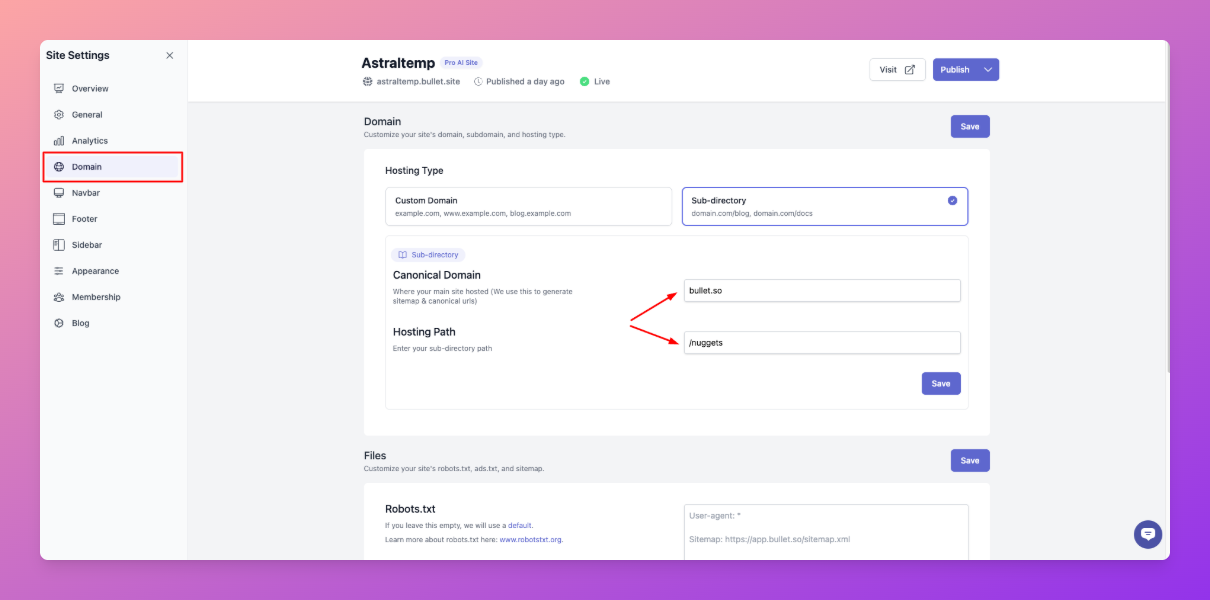
- Next, enter the domain name and the sub-directory (Hosting path) details for your site.
Step 2: Setting up a reverse proxy
Now we have to set a reverse proxy to your primary domain and the sub-directory. You can use any one of the below options to setup your reverse proxy.
1. Cloudflare workers.
-
Create a new Cloudflare worker, and add the below code.
-
Now, In the 3rd line in the code add the current URL of your bullet site. You will find in your Site settings in your bullet dashboard.
-
Next, In the 4th line of the code add the subrirectory(Hosting path) details you added in the Bullet dashboard.
  addEventListener('fetch', (event) => {

      // Add your bullet subdomain below. Avoid trailing slash

      const bulletUrl = new URL(`https://your-url-bullet.pages.dev`)

      // Add sub-directory path where you want to see your bullet site in the next line. Avoid trailing slash/

      const subdirectory = "/blog"

      const requestUrl = new URL(event.request.url)

      const pathname = requestUrl.pathname

      if (pathname.startsWith(`${subdirectory}/`) || pathname === subdirectory) {

          event.passThroughOnException()

          event.respondWith(fetch(`${bulletUrl.origin}${pathname.replace(subdirectory, "")}${requestUrl.search}`, event.request).then((response) => {

              const clonedResponse = new Response(response.body, response);

              if (clonedResponse.status === 308) {

                  const redirectLocation = clonedResponse.headers.get("location");

                  const destination = (subdirectory + redirectLocation + "/").replace('//', '/');

                  redirectLocation && clonedResponse.headers.set("location", destination);

              }

              return clonedResponse;

          }))

      } else {

          event.respondWith(fetch(event.request))

      }

  })
- After creating the worker and deploying, add the Worker Route, and set the path to <https://example.com/blog>*
2. Nginx
-
Add the below snippet in your nginx configuration(.conf) file.
-
Update and replace your placeholder proxy_pass details with your bullet domain.
  location /blog/ {

  proxy_pass https://{{bullet-subdomain}}-bullet.pages.dev/;

  proxy_ssl_server_name on;

  }
3. Next.js
-
Add the Below Code in your next.config.js file.
-
Replace the placeholder data in the code below with appropriate details.
  // next.config.js

  /** @type {import('next').NextConfig} */

  const config = {

      rewrites() {

          const bulletUrl = new URL(

              `https://{{bullet-subdomain}}-bullet.pages.dev`,

          ).origin

          return [\

              {\

                  source: '/blog',\

                  destination: `${bulletUrl}`,\

              },// match all paths with extension eg .xml, .json etc.\

              {\

                  source: '/blog/:slug(.*\\.[a-zA-Z]{2,5}$)',\

                  destination: `${bulletUrl}/:slug`,\

              },// match all paths starting with /blog\

              {\

                  source: '/blog/:path*',\

                  destination: `${bulletUrl}/:path*/`,\

              },\

          ]

      },

  }

  module.exports = config
By default, next.js will redirect URL with a trailing slash. Because of this, there will be a redirect for every blog post. To avoid this, we can add the below code in next.config.js file.
trailingSlash: true
Feel free to reach out to us in case you have any issues.